What to Grow from Scraps (And What’s Actually Worth the Effort)
The root end of a green onion costs nothing to keep. You trim the green tops, set the white root end in a glass of water on the windowsill, and four days later, there are green shoots coming back up. That’s the whole idea behind scrap gardening: using what you’d otherwise throw away to grow something you can actually eat.
It sounds too simple. Some of it is. But a handful of kitchen scraps do regrow reliably, and if you have a rooftop, a balcony, or even a bright windowsill, you can put them to work.
This is what grows, what doesn’t, and where people go wrong.
What “Growing from Scraps” Actually Means
Before going any further, it’s worth being honest about what this is.
Regrowing from scraps is propagation using a living piece of a plant to generate new growth. It is not magic, and it doesn’t replace buying seeds or seedlings. Most scraps will give you one more cycle of the plant, usually smaller and shorter-lived than the original. A few ginger, garlic, mint can become permanent residents in your pot collection if you treat them right.
Expect smaller yields than a seed-started plant. Expect a few failures, especially in the first month while you figure out what your windowsill or rooftop can actually support. What scrap gardening gives you in return is immediacy. You don’t wait for germination. You start with a living thing that already knows how to grow it just needs a reason to keep going.
What this is good for: supplementing fresh herbs and greens between market runs. Starting with something tangible before committing to seeds.
What this isn’t: a replacement for a proper growing setup. It’s a starting point, and for some people, it becomes the gateway into keeping a rooftop full of pots.
The Scraps That Reliably Regrow
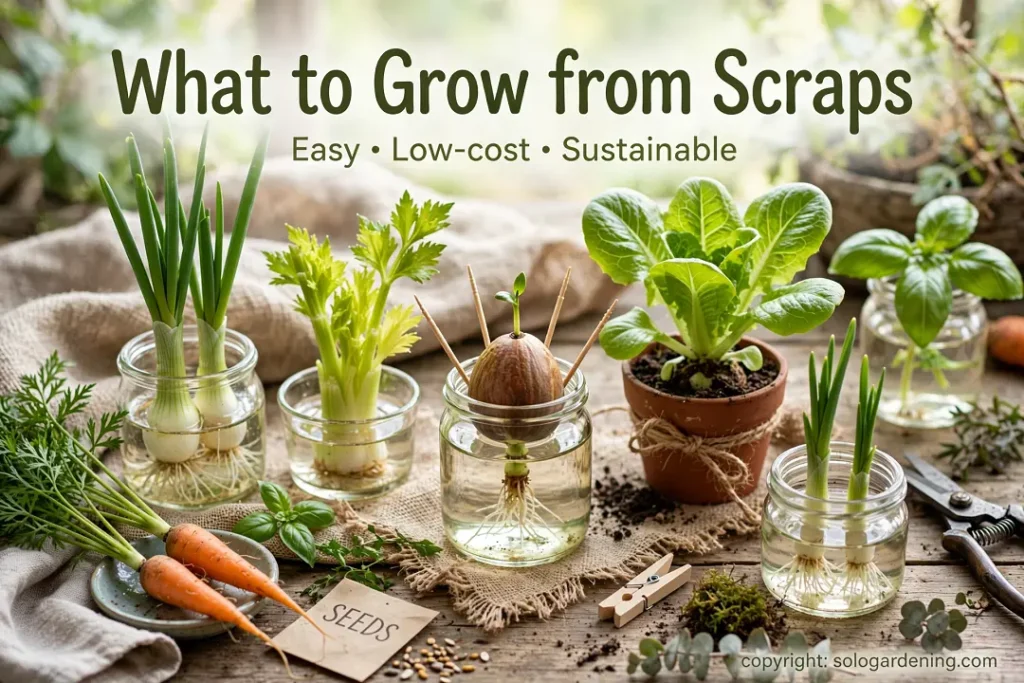
Eight crops. Some in water, some straight to soil, some as cuttings. Here’s what actually works in a small-space growing setup.
Green Onions: The One That Always Works
Cut the green tops to within 2–3 cm of the white root end. Place the root end in a glass or jar with 2–3 cm of water just enough to cover the roots without drowning the cut end. Set it somewhere with at least 4 hours of direct light.
Roots will strengthen within 2–3 days. Green shoots will appear and be harvestable within 7–10 days.
You can harvest from water indefinitely, but the flavour gets weaker over time. After two or three harvests, transfer to a 10–15 cm pot of well-draining compost. Growth becomes steadier and the flavour returns to something close to what you bought.
Keep multiple batches going. Green onions are the one scrap that genuinely earns its place on a windowsill or balcony railing no fuss, no failure rate worth worrying about.
Lettuce: Usable, But Know the Limits
Cut a head of lettuce, leaving 4–5 cm of the base intact. Place the base in a shallow dish with 1–2 cm of water not submerged, just the very bottom sitting in water. Change the water every two days.
Within 10–14 days, new leaves will emerge from the centre. They’re small, slightly bitter, and entirely usable in salads.
What you won’t get is another full head. Lettuce regrowth in water produces only young, tender leaves, but nothing like the original plant. Think of it as a bonus harvest of salad greens, not a replacement head.
Transfer to a 15 cm pot with compost if you want more sustained growth. In warm weather (above 24°C), the plant will bolt faster than it produces, so the window is short. Harvest young and harvest often.
Celery: Works If You Move It to Soil in Time
Slice the base from a bunch of celery, keeping 5–6 cm of the stalk base. Place it in a bowl with 1–2 cm of water. Set in a sunny spot.
Within a week, you’ll see small leaves emerging from the centre. This is the signal to act. Celery bases left in water beyond 10 days tend to develop rot rather than viable root systems. The outer stalks soften, the base goes slimy, and nothing transplants successfully.
Move it to a 20 cm pot of compost while the leaves are still small and the base is still firm. Water in well. Full sun, daily watering in warm weather. What grows back won’t be supermarket celery; the stalks are thinner and more bitter – but the leaves are genuinely useful in cooking, and the stalks work in stocks and soups.
Garlic: Two Uses from One Clove
Garlic from a bulb that’s starting to sprout is ideal. Even a clove with no visible sprouting will work.
For garlic greens – the faster, easier option – plant a single clove pointed end up in a 10 cm pot with 5 cm of compost on top. Keep it moist. Within 7–10 days, green shoots appear. Harvest these as you would chives. The flavour is mild garlic, slightly grassy, good in eggs and stir-fries. The clove underneath will eventually exhaust itself, but it gives you weeks of steady green harvests first.
For a full bulb, you need a deeper pot – minimum 20 cm depth, one clove per 10 cm of pot width – and several months of patience. Full sun, good drainage, and a period of cooler temperatures to trigger proper bulb development. In a hot climate, timing matters: plant in the cooler months (October–February in Dhaka) for best bulb development.
Ginger : Slow, But It Works
Find a piece of ginger with at least one visible growth bud – a small, slightly lighter-coloured bump on the surface of the rhizome. A piece the size of your thumb is enough to start.
Plant it just below the soil surface in a wide, shallow pot – minimum 30 cm wide and 25 cm deep. Ginger spreads horizontally, so width matters more than depth. Use rich, well-draining compost. Water lightly and then leave it alone.
This is where most people fail. Before the first sprout appears – which can take 2–4 weeks – the rhizome is sitting in soil with no visible activity. Overwatering during this period causes rot. Keep the soil barely moist, not wet. Once a shoot appears, water more regularly and move the pot to a warm spot with indirect light or morning sun.
Ginger is slow. But it keeps growing all season, and a single rhizome planted in spring can give you enough fresh ginger by autumn to last months.
Basil and Mint – Stem Cuttings, Not True Scraps
Technically these aren’t kitchen scraps – they’re cuttings from a plant you’ve bought. But a pot of supermarket basil or mint gives you far more material than most people use before the plant declines, so the principle is the same.
Take a 10 cm stem with at least two sets of leaves. Strip the lower leaves, leaving two sets at the top. Place the cut end in a glass of water so that at least one node – a leaf joint – is submerged. Set in a bright spot out of direct afternoon sun.
Basil roots in 7–14 days. Mint is faster: 5–10 days. Pot up when roots reach 2–3 cm – any longer in water and basil in particular becomes leggy and weak.
[INSERT MY BASIL CUTTING IN WATER PHOTO HERE]
One important note on mint: pot it separately. Mint spreads aggressively through its root system and will crowd out anything nearby. A dedicated 20 cm pot is the minimum. It’ll take over that too, eventually.
Full guides for both: How to grow basil in containers → and How to grow mint →
Lemongrass – Worth It If You Cook with It
Buy a bundle of lemongrass with the base intact – the pale, slightly bulbous end where the stalks converge. This is the part that roots. If the base has been trimmed flat, it won’t work.
Place two or three stalks base-down in a tall glass with 3–4 cm of water. Change the water every two days. Within 1–2 weeks, roots will appear. Once roots are 2–3 cm long, transplant to a 25–30 cm pot of well-draining compost. Full sun, consistent watering. Lemongrass grows large; it can reach 60–90 cm in a season, so give it space.
Harvest outer stalks by cutting at the base once the plant is established. The inner stalks keep growing.
Moving from Water to Soil: When and How
Most water-started scraps need to move to soil eventually. Water keeps them alive; soil gives them the nutrients to produce.
The transfer moment is specific. You’re looking for roots that are white or pale yellow, 2–3 cm long, and firm – not slimy. Slimy roots mean the water has gone bad and the cutting is struggling. Firm roots mean it’s ready.
Use a pot with drainage holes. Fill with good-quality, well-draining compost. The standard multipurpose mix from any nursery is fine. Don’t use garden soil in a pot; it compacts and stops drainage.
Make a small hole in the compost, settle the roots in without bending them, and firm the compost gently around the base. Water well on the day of transplanting, then let the top 2–3 cm dry out before watering again. The plant needs to find its footing in the soil before you start a regular watering schedule.
For rooftop growers: pots on a rooftop dry out significantly faster than pots on a shaded balcony. Check the soil daily for the first week after transplanting, especially in summer.
A Note on Heat
If you’re growing in a hot climate – Dhaka or anywhere with summers above 35°C – a few things change.
Water containers for scrap propagation need to be changed daily, not every two days. At 35°C+, bacteria multiply fast in standing water. A green onion that would take three days to start rooting in cooler weather may start to soften before it roots in the heat. Keep the water fresh, keep the container clean.
Basil cuttings root faster in warm weather, which is a genuine advantage. Mint is even more vigorous. Ginger, which loves heat, will sprout faster than the 4-week estimate above.
Lettuce is the one to watch. Above 30°C, regrowing lettuce in water becomes difficult – it bolts the moment it hits soil. It’s better attempted in October–February in Dhaka, when temperatures drop enough to give it a real growing window.
Keep water-propagation glasses out of direct afternoon sun. The water heats up, which accelerates rot and discourages rooting. A bright, shaded spot on a north-facing windowsill or a spot under a shade cloth works better than a sun-baked rooftop corner.
Tonight, start with a green onion. Set the root end in a glass of water, put it on the brightest windowsill you have, and check it in three days. That’s the whole introduction to scrap gardening. Everything else the ginger, the lemongrass, the basil cuttings follows once you’ve seen that first small act of regrowth and decided you want more of it.
When you’re ready to expand beyond scraps, What to grow at home → is where to go next.